Creating & Customising Plans

Build structured, goal-oriented plans tailored to your client’s clinical needs. Action Plans allow you to deliver clear, actionable guidance to your clients. Whether you are building meal plans, exercise routines, or general lifestyle recommendations, this section helps you manage those resources effectively.

Create a New Plan

Create a personalised clinical plan template to use across multiple clients.
1
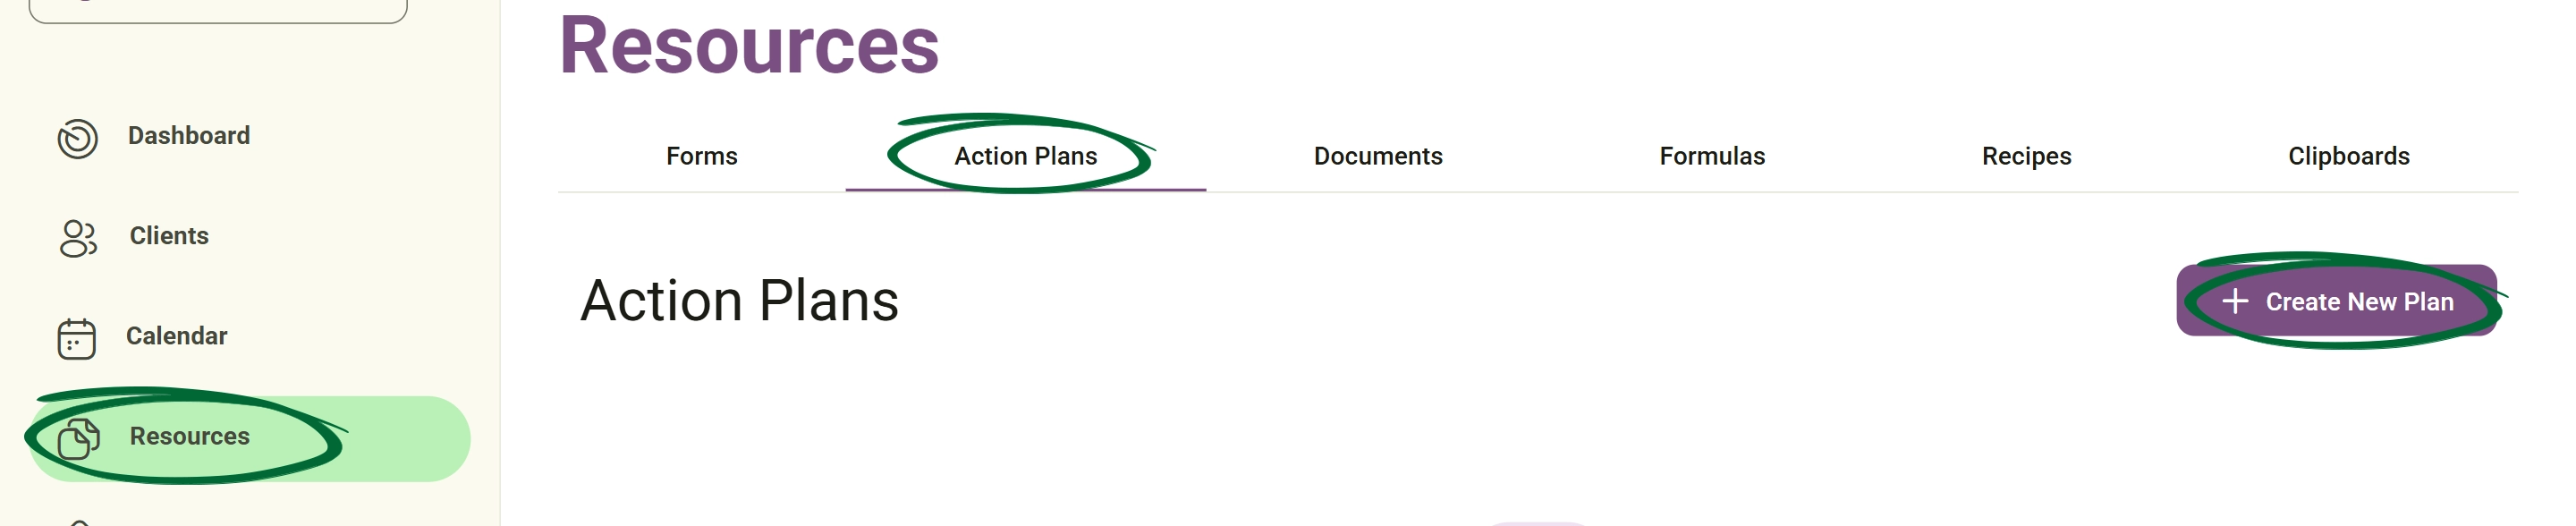
Go to Action Plans
Navigate to Resources → Action Plans
Go to Action Plans screenshot
2
Click “Create New Plan”
Start a fresh plan template.
3
Add Template Information
Enter a descriptive template name and a brief summary.
4
Set Plan Goal

Select a primary goal (e.g., Weight Loss, Muscle Gain, or Weight Maintenance). 

After choosing the primary goal, you can select a more specific goal from the dropdown list—such as managing constipation, diarrhoea, bloating and gas, or Acid Reflux (GERD)—to help tailor the plan more accurately to the client’s condition.
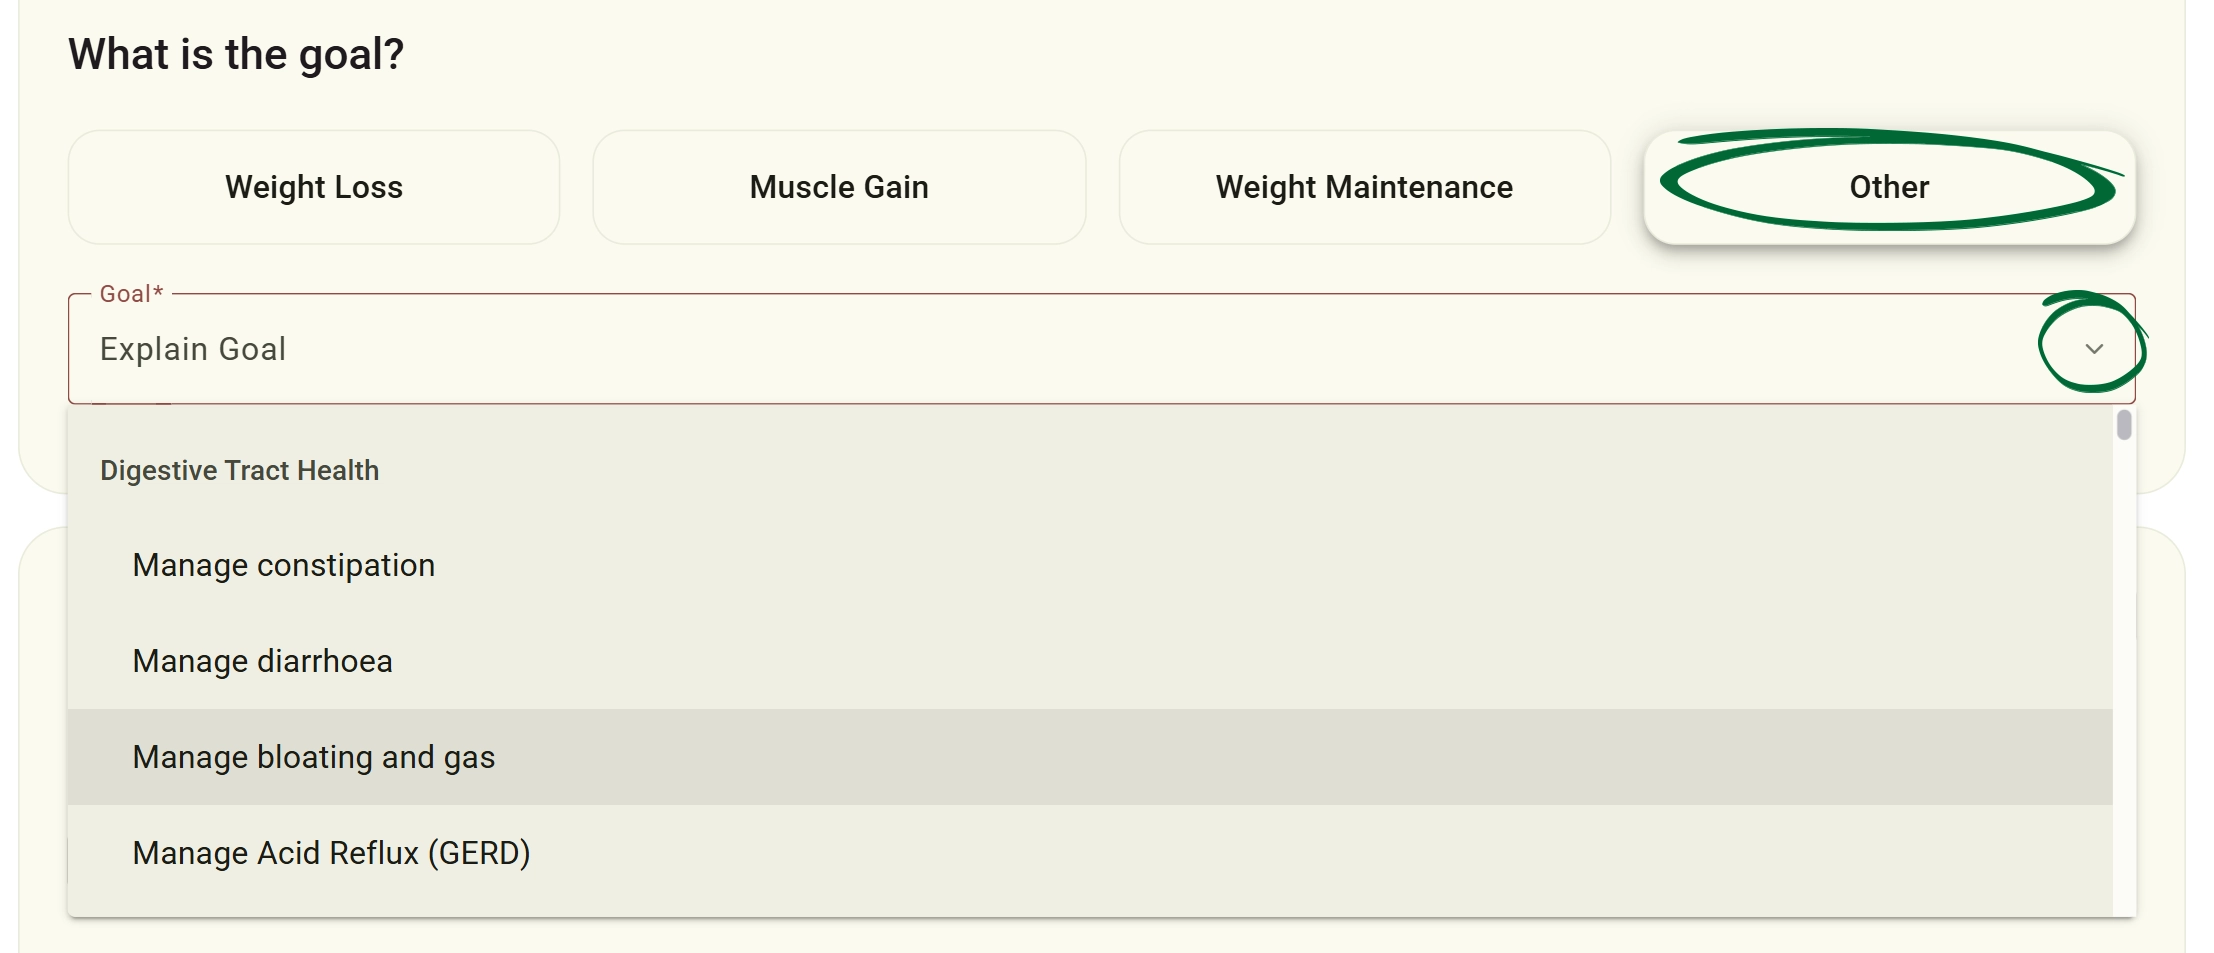
Set Plan Goal screenshot
5
Build Plan Sections
Add modular sections such as Meal Plans, General Recommendations, or Exercise Plans.
6
Structured Plan Sections
The system provides easily customisable, ready-made sections to build a complete plan. You can organise "Meals" across breakfast, lunch, dinner, and snacks, or provide "General Recommendations." You can also configure detailed fields for an "Exercise Plan" (activity, duration, frequency, intensity, and notes), "Sleep Recommendations" (duration, quality, and schedule), and specific "Supplement Recommendations" (name, dosage, timing, and purpose).
7
Add Content
You can fill each section with essential details, including meals, clinical notes, activities, recommendations, and lifestyle guidance.
8
Add Meal Options

Within the meal sections, you can easily attach a complete recipe to any meal item by clicking the "Choose recipe" button. If you wish to provide multiple choices for your clients, simply click "Add Option" to create alternative meals, where you can also assign specific recipes and detail their nutritional information.

Customise Meal Names: Once you have selected a recipe, you can easily rename or customise the meal title in the text box so it appears exactly as you want it for your client, without altering the original recipe's underlying data. 
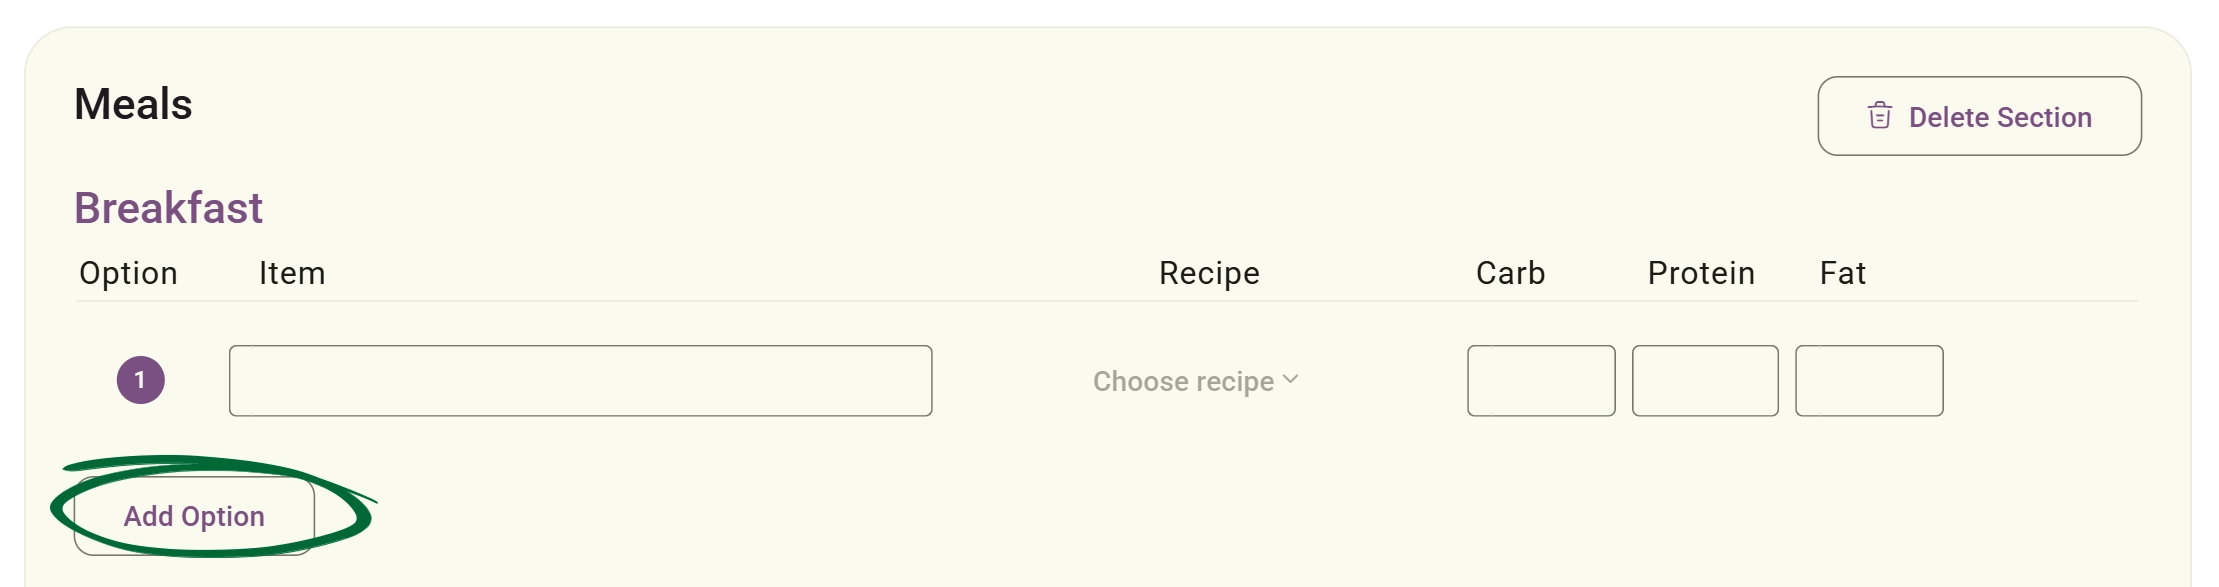
Add Content Section screenshot

When you click "Choose recipe", a search window will appear with three tabs to help you find exactly what you need: 

  • Team: Browse through recipes created by you or saved by your team members. 
  • Nurish: Search within Nurish's comprehensive internal recipe database.
  • Fat Secret: Access an extensive external database containing thousands of ready-made recipes.  
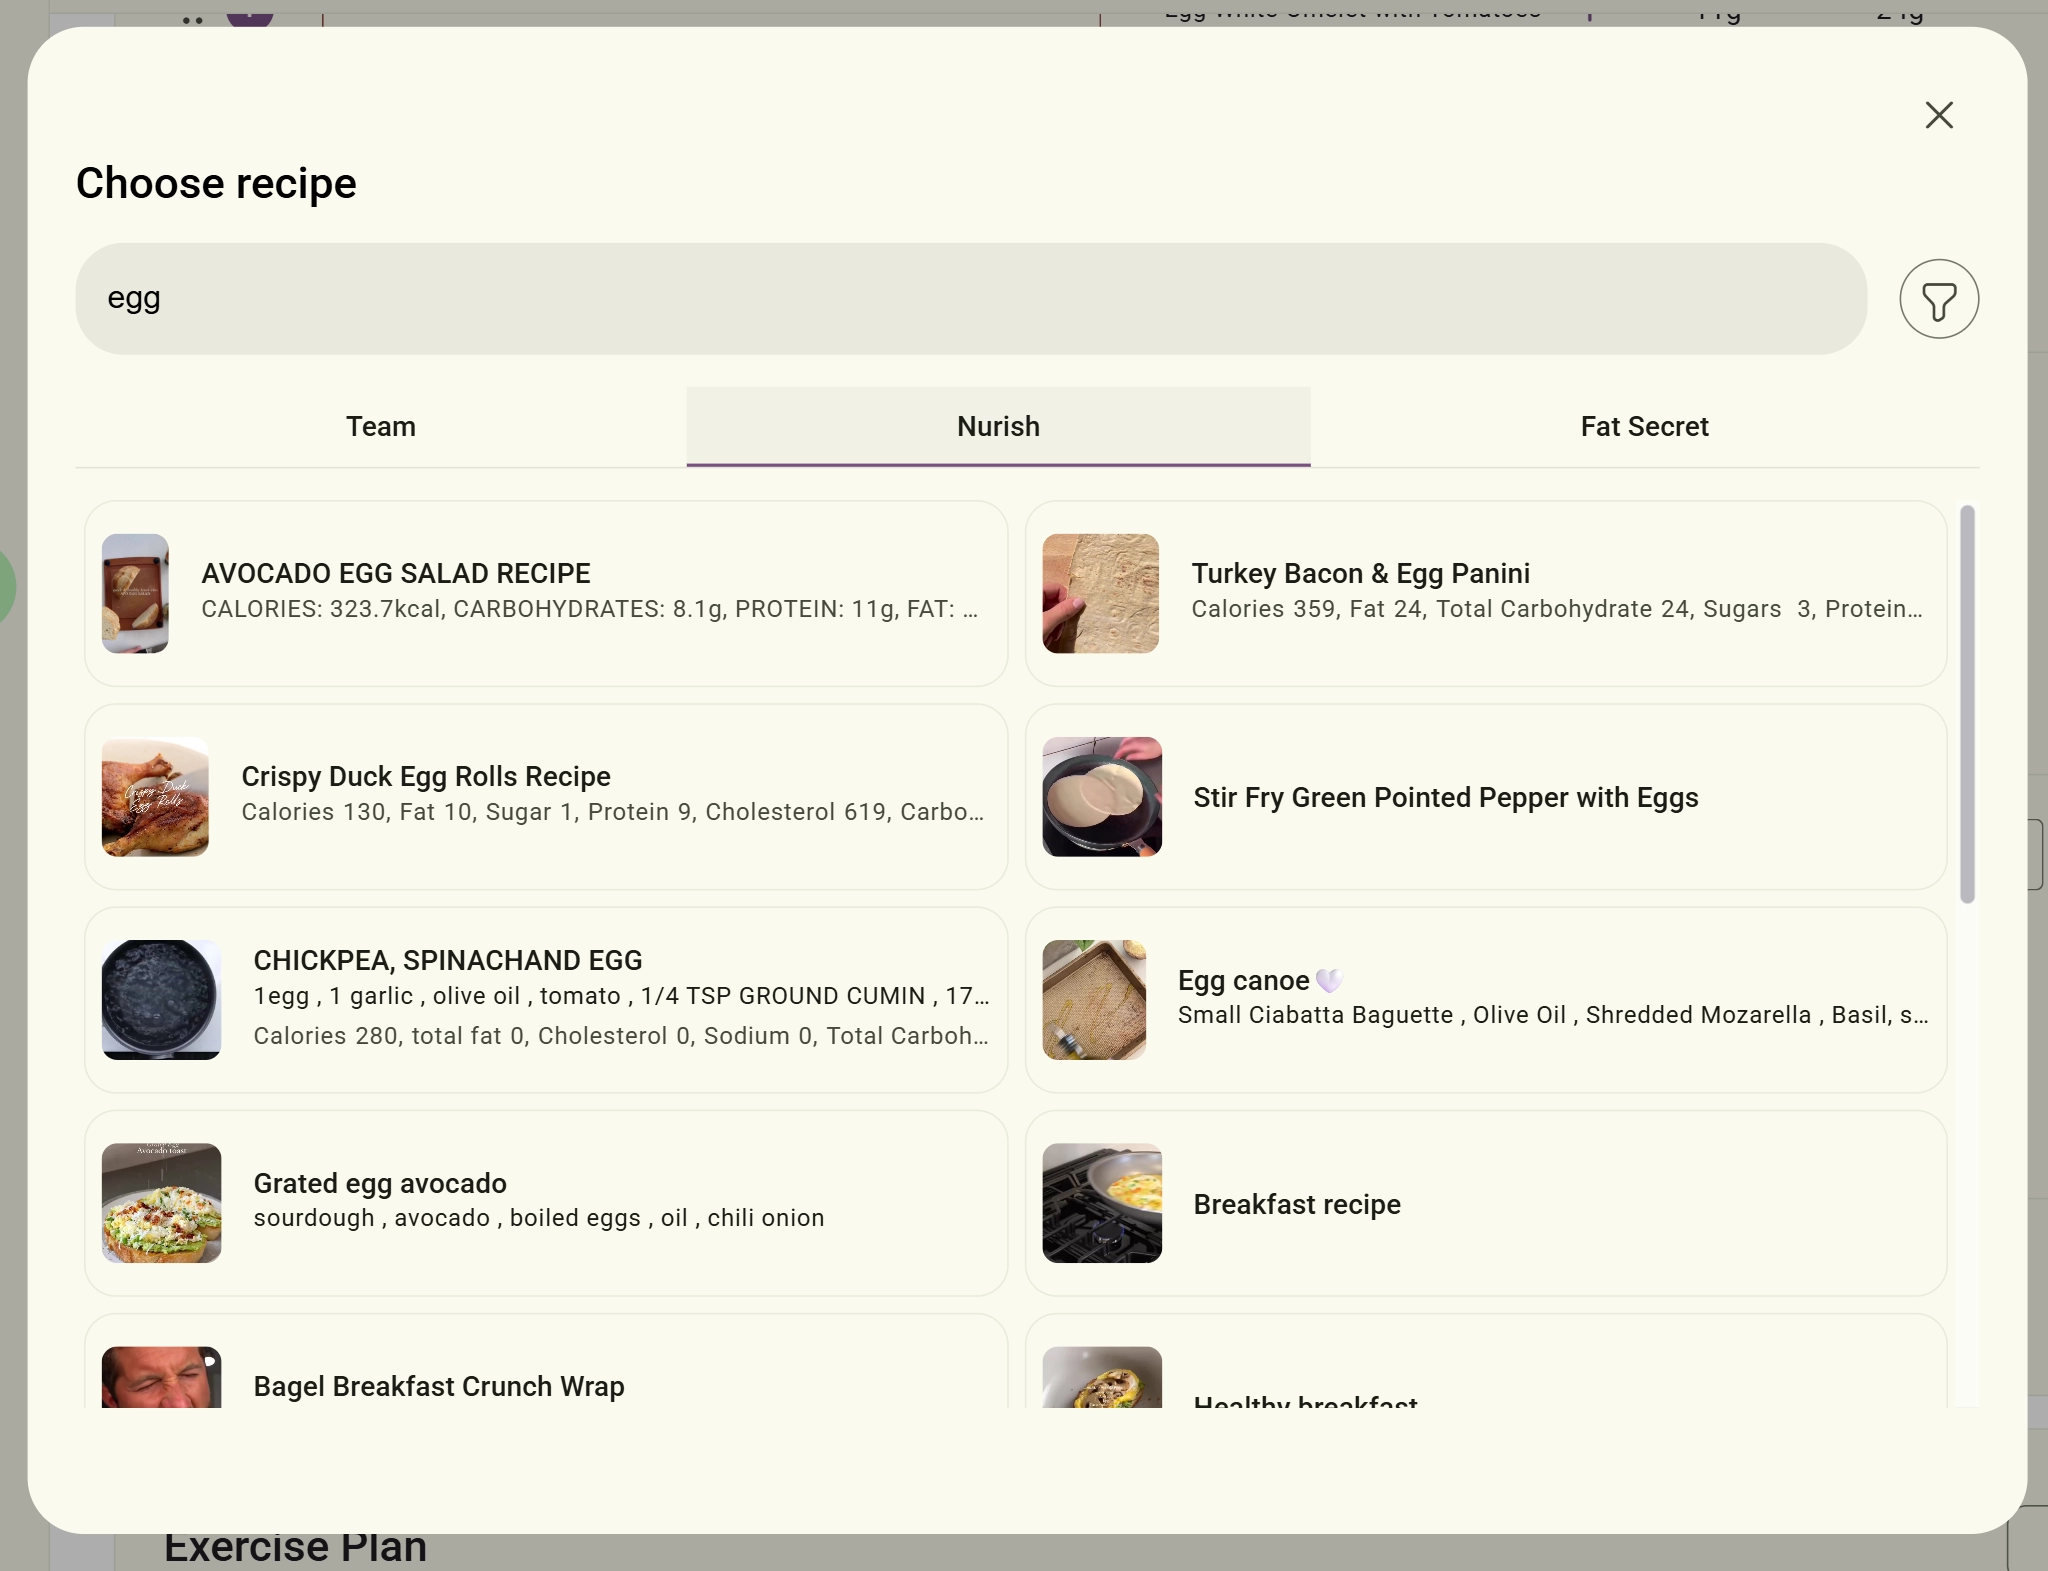
recipe search window screenshot

Clicking on any recipe opens the complete Recipe Card, which displays the recipe image, nutrition facts, an interactive ingredients list, and step-by-step preparation instructions.
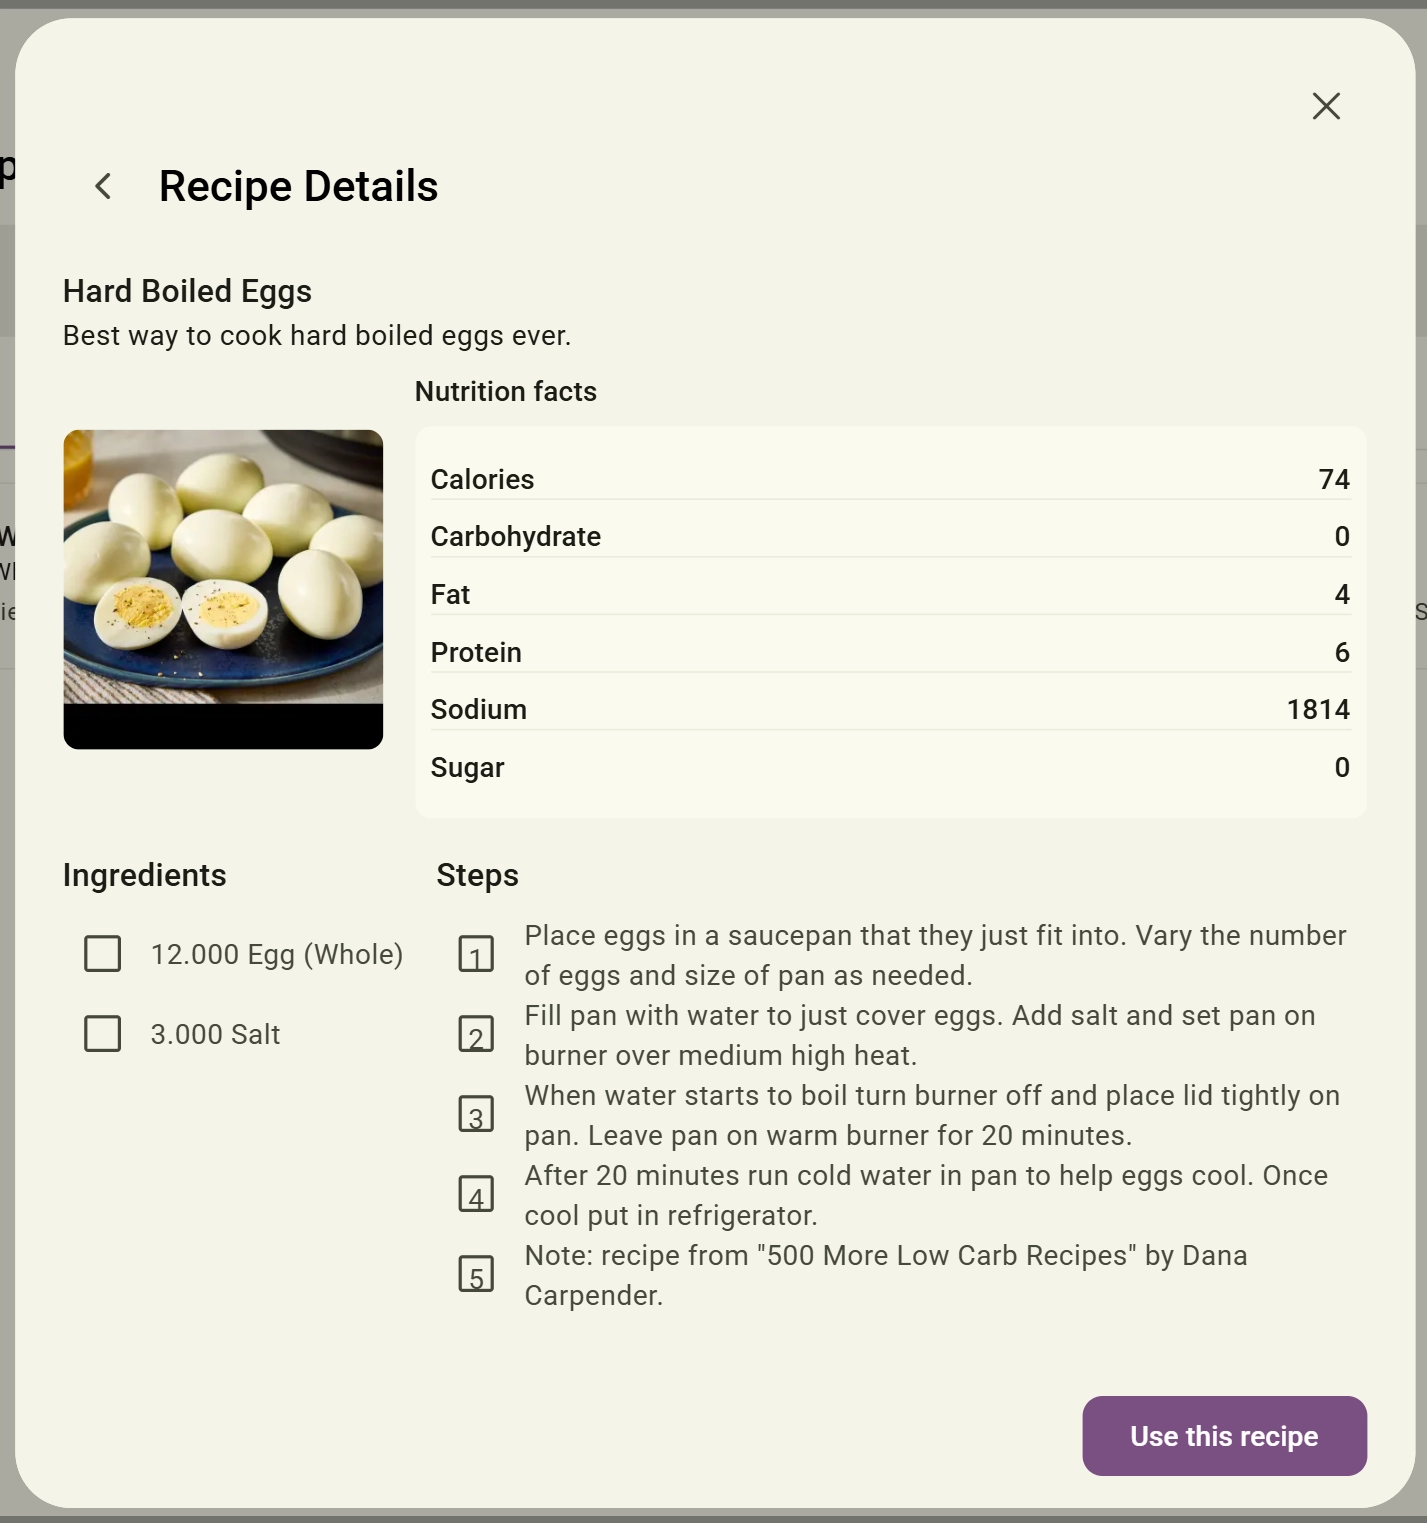
Recipe Card screenshot

How Your Clients View Recipes 

  • Client Portal View: Clients can access their meal plans within the "Health Records" tab to view them, including the complete recipes.
  • Email & PDF: Recipes can be sent directly to your clients via email when you send the meal plan with them.
9
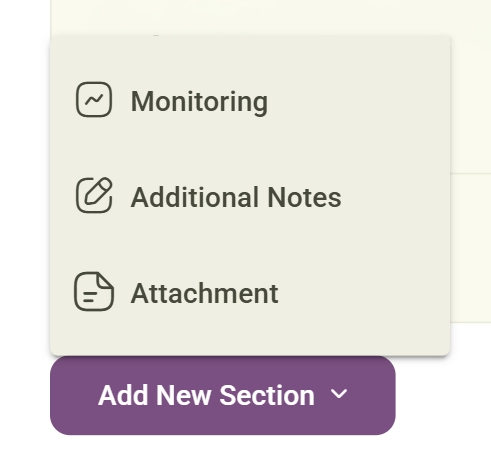
Add Custom Sections
Use: “Add New Section” to create completely custom plan sections tailored to your workflow or speciality.
Add Content Section screenshot
10
Additional notes
Plans support a full rich text editor to create professional, easy-to-read layouts. You can utilise bold, italic, and underline formatting, structure content with bullet points and headings, adjust text alignment, and easily insert hyperlinks, images, and tables. You can insert saved Clipboard content directly inside the plan editor.
11
Save as Template
Click Save as Template to store it in your library or Send to Client.
12
Plan Labels
Each plan card displays labels such as Weight Loss, Muscle Gain, Weight Maintenance, or Team Resource to make browsing and organising plans easier.
Tip: Create templates for your most common client goals to significantly speed up your weekly workflow.
Action Plan Templates vs AI Plans

Nurish Pro provides two different ways to create action plans depending on your workflow.

1
Action Plan Templates

Action Plan Templates are reusable frameworks created and stored within Resources → Action Plans. They can be seamlessly applied across multiple clients.

Once created, templates can be reused, edited, and assigned to different clients when needed.  

2
AI Plans Tailored by Client Data
AI Plans are generated using information specific to an individual client. The AI uses available client data, records, goals, and profile information to create a personalised plan tailored to that client’s needs. Unlike templates, AI Plans are generated for a specific client and are not intended to be used as reusable resources across multiple clients.
Edit Plan Template

Modify an existing plan template to refine your clinical approach.

1
Open Plan
2
Click “Edit Plan”

Open the interactive plan editor. 

3
Update Content

Edit sections, change meal suggestions, or update clinical notes.

4
Save Changes
Click save to apply updates to the template.
5
Duplicate Plan
Use: “Duplicate” to create a copy of an existing plan and modify it instead of starting from scratch.
6
Quick Send from Editor
You can also send the plan directly from the Edit Plan screen using: “Send to Client” without returning to the Action Plans list.
Quick Send from Editor screenshot
Send Plan to Client

Share your completed plans with clients and manage your digital library.
1
Go to Action Plans
Go to your Action Plans library.
2
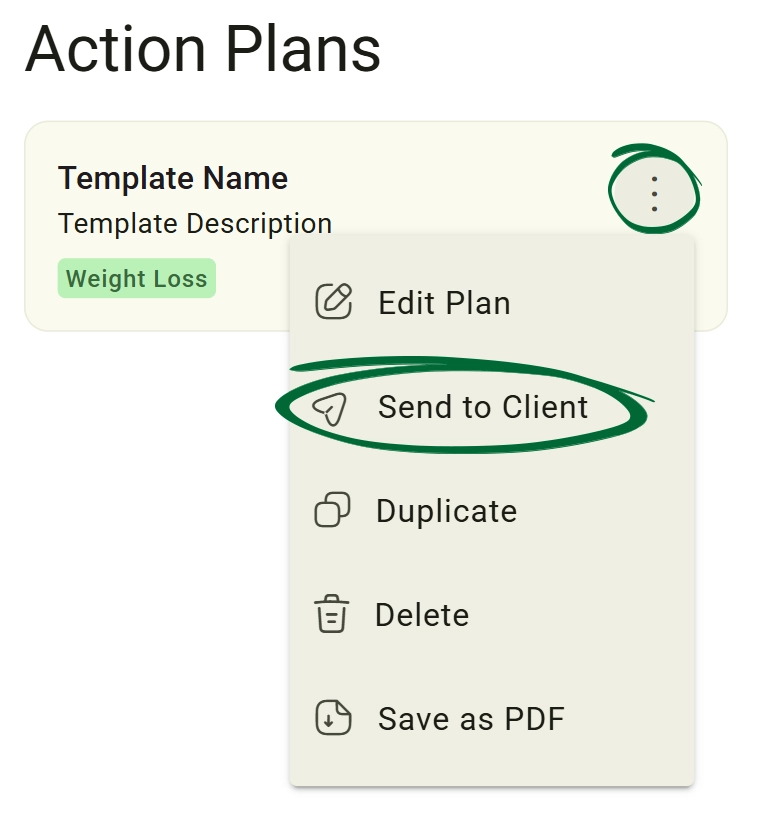
Open Options Menu (⋮)
Click the three dots on the specific plan.
3
Click “Send to Client”
Select the send option
Click “Send to Client screenshot
4
Select Client
Choose the recipient from your client database.
5
Click “Send”
Confirm to deliver the plan to the client portal and email.
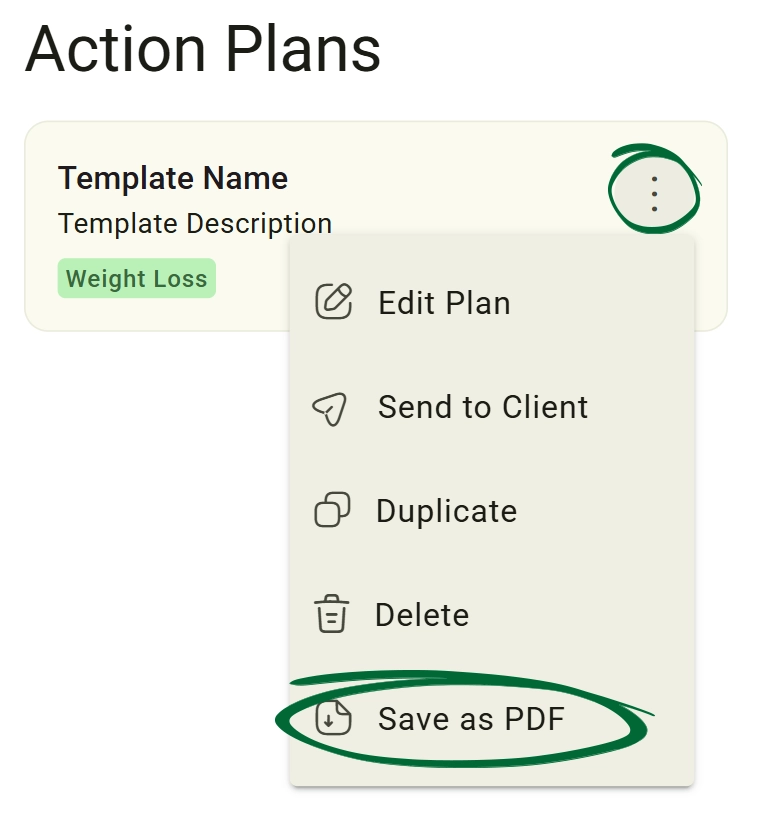
Save Plan as PDF

Export a plan as a document

1
Open Options Menu (⋮)
Select the menu on the desired plan.
2
Click “Save as PDF”
Choose the PDF export option
Click “Save as PDF” screenshot
3
Download File
Save the PDF locally for: Printing or External records Sharing
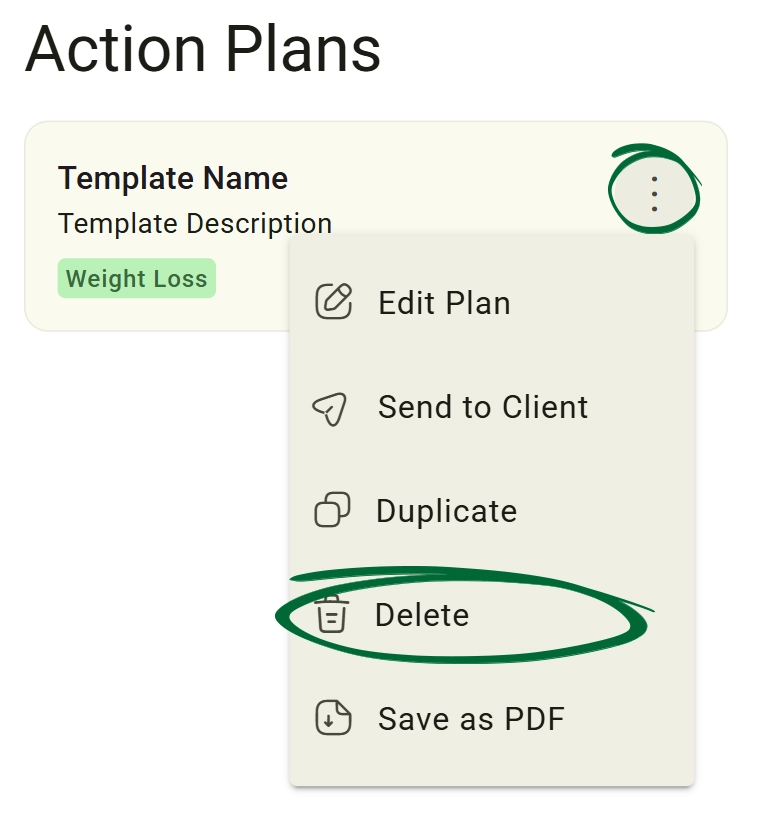
Delete Plan

Remove a plan from your library

1
Open Options Menu (⋮)
Select the menu on the plan you wish to remove.
2
Click “Delete”
Choose the delete option.
Click “Delete” screenshot
3
Confirm Deletion
Remove the file.
Tip: Only delete plans you no longer need; this action is permanent and cannot be undone.
Share with the Team

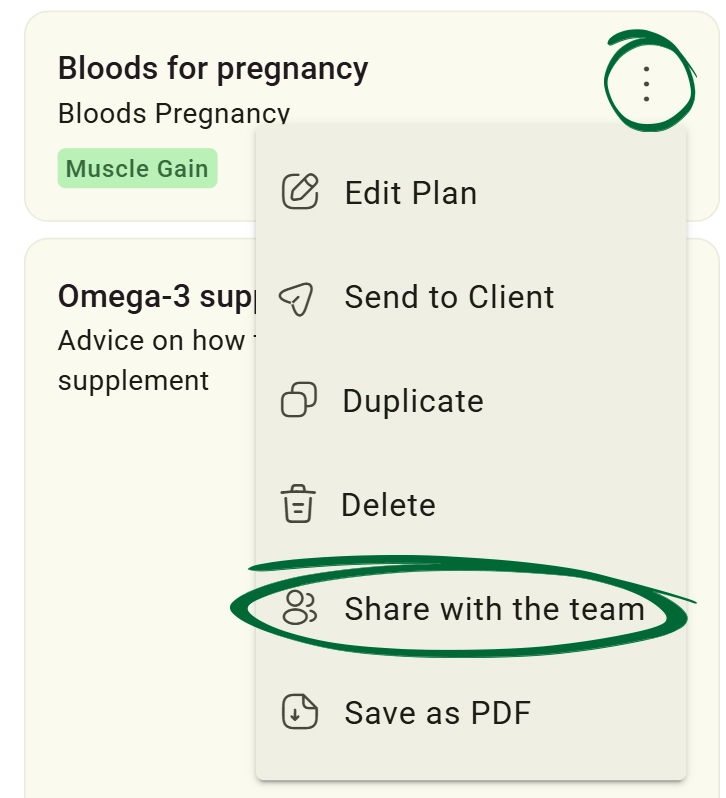
to make templates accessible to other practitioners or staff members. (Note: This feature is exclusive to Team and Enterprise subscriptions.)
1
Open Options Menu (⋮)
Select the menu on the plan you wish to share.
2
Click “Share with the team”
Choose the share with the team option.
Share with the Team screenshot
Frequently Asked Questions (FAQs)
Can I select more than one primary goal for a plan?
Currently, each plan is linked to one primary clinical goal (e.g., Weight Loss) to ensure the AI and tracking tools remain focused. However, you can add custom sections to address secondary goals within the same plan.
If I edit a template, will it update the plans already sent to clients?
No. Editing a template only affects future plans created from that template. This protects the historical accuracy of the specific advice you gave to a client in the past.
Can I add my own custom sections that aren't in the default list?
Yes. Use the "Add New Section" option to create headers and text areas for any clinical or lifestyle advice that doesn't fit into the standard Meal or Exercise categories.
Where can I create an AI plan based on my client's data?
To create an AI-generated plan, navigate to the Clients section and open the specific client's profile. From the Action Plans tab, click "Generate with AI" to automatically generate a personalised plan based on the client's available data.
Troubleshooting & Common Issues
Issue: Changes are not appearing
Potential Solution: Ensure you clicked Save as Template before exiting the page. Unsaved changes are cleared when you navigate away from the editor.
Issue: Client did not receive the plan
Potential Solution: Check the selected client card/info in your "Clients" tab for email accuracy. Ask the client to check their portal or junk folder, and use the Resend option if necessary.
Issue: PDF looks different from the plan
Potential Solution: This is expected. The PDF is specifically formatted for high-quality sharing and printing, which may differ slightly from the interactive dashboard view.
Issue: Cannot find a saved template
Potential Solution: Ensure you are looking in the Templates tab rather than a specific client's active plan list.

Next Step

Your action plans are ready! Continue to Recipes to enhance your client programmes with specific nutritional guidance.

Go to Recipes
Contact Support

Need Help?

Email Support: [email protected]