Referrals Management

This guide explains how to generate referral links, manage your referrers, track client referral requests, and schedule appointments with referred clients.

1. View and Edit a Referral Request

Review detailed client information submitted by a referrer, inspect attached files, and add administrative notes.

1
Open Referral Requests

Select the Referral Requests tab within the Referrals module.
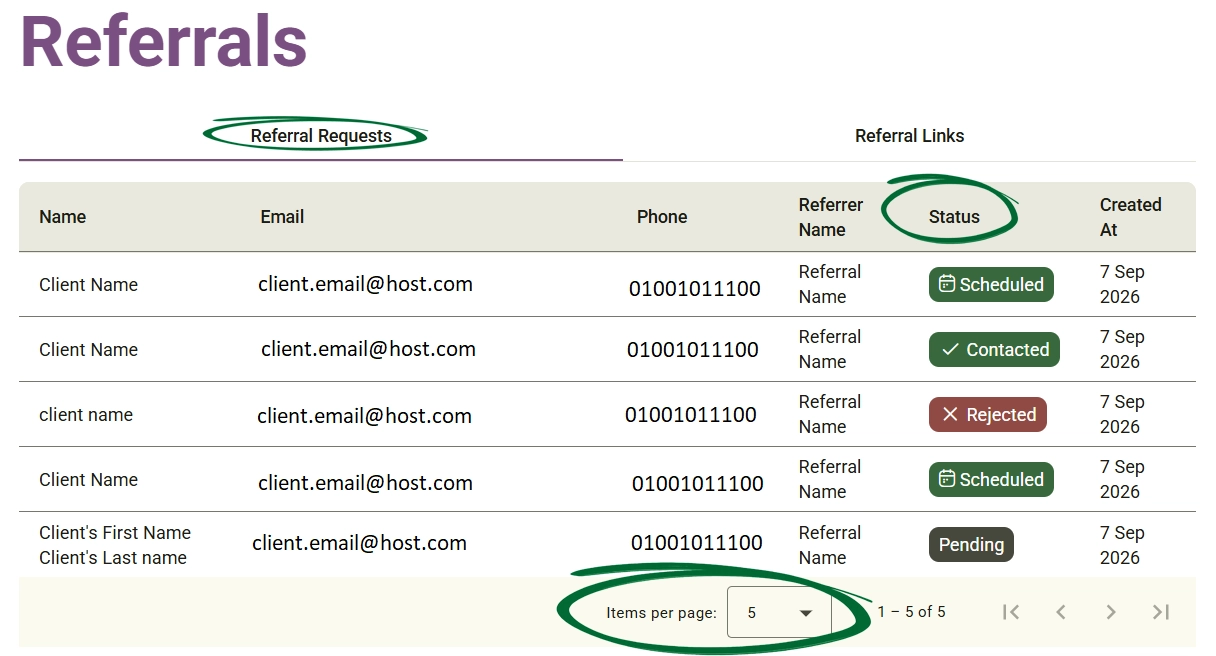
referral requests screenshot
2
Open Referral Details

Click on a specific client row to open the comprehensive Referral Details page.

3
Review Info and Attached Files

Examine the Referrer, Client's Info, and preview any uploaded documents (such as medical reports or PDFs) in the Attached Files previewer.

4
Add Internal Notes

 Type administrative comments or client notes into the rich text editor under Your Input, then click Save.
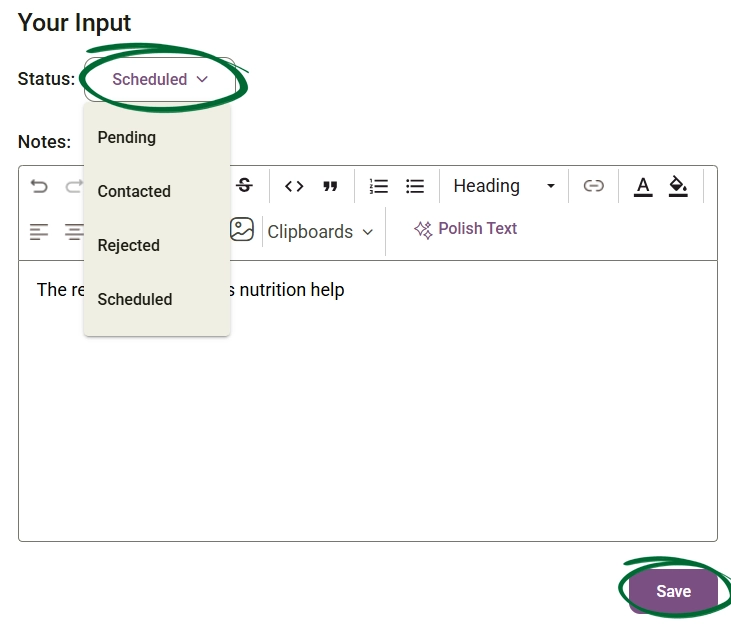
screenshot of your input section in referral details screen
Note: Always click Save after editing notes or updating client records to ensure all changes are stored.
2. Create an Appointment with the Referred Client

Schedule a consultation or follow-up session directly with the referred client from their referral request.

1
Trigger Appointment Setup

Click on a specific client row in the referral request page to open the Referral Details page, click the Create Appointment button in the top-right corner.

2
Configure Appointment Details

 In the modal window, enter the Appointment Title, choose the Location (Video Call or In Person), and set the Duration, Date, and Time.
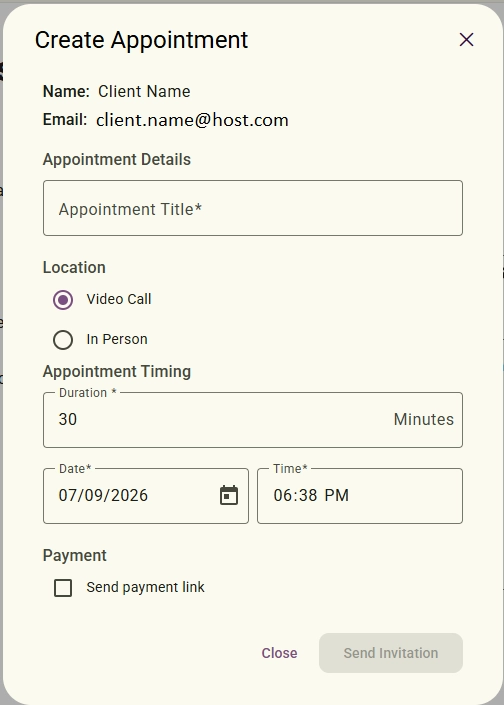
add media screenshot
3
Dispatch Invitation

Tick Send payment link if applicable, then click Send Invitation to finalize the booking and notify the client.

Note: The client's name and email address are automatically populated into the appointment window from their referral record.
3. Referral Request Status

Track and update the progression of client leads through your operational workflow.

1
Access Status Setting

Navigate to the Referral Details page for the target client request.

2
Update Workflow Stage

Under Your Input, click the Status dropdown menu and select the appropriate stage:

  • Pending:  Newly received request awaiting review. (Default status)
  • Contacted:Initial communication with the client has begun. (Updated manually)
  • Scheduled: An appointment has been successfully booked. (Updated automatically or manually)
  • Rejected: The client request has been declined. (Updated manually)
add media screenshot
3
Save Status Change

Click Save at the bottom-right of the input section to apply the update.

Note: Keeping referral statuses updated ensures accurate analytics and seamless coordination across your care team.
Frequently Asked Questions (FAQs)
Can a referrer submit multiple clients using the same referral link?
Yes. An active referral link can be reused by the referrer to submit multiple client requests over time.
What happens when I set a referral link status to Inactive?
Deactivating a referral link prevents the referrer from submitting any new client forms via that link. Existing requests previously submitted will remain unaffected.
What happens when I delete a referral link? 
Deleting a referral link permanently removes the link record from your list and immediately disables it, preventing any further submissions. Any client referral requests that were already submitted prior to deletion will remain safely saved in your Referral Requests tab.
Will the status change to Scheduled automatically if I create an appointment?
Yes. When you schedule an appointment directly from the Referral Details page, the system automatically updates the request status from Pending to Scheduled.
Troubleshooting & Common Issues
Issue: The referrer did not receive the automated email invitation
Potential Solution: Check that the email address was entered correctly in the Create Referral Link form. Ask the referrer to check their spam or junk mail folder. Use the Copy Link option from the action menu in the Referral Links tab to copy the URL and send it to them directly via email or chat.
Issue: The referral form link displays an error or is inactive.
Potential Solution: Check the Referral Links table to confirm that the link's status is set to Active. If the status is Inactive, open the three-dot action menu and select Activate.

Next Step

Now that you've got the hang of how Referrals Management works, it’s time to put what you've learnt into action! Head straight over to your Nurish Pro platform to start creating referral links, tracking incoming client leads, and expanding your practice.  

Go to Referrals
Contact Support

Still need a hand?

Email Support: [email protected]