Earnings & Payment Links

Welcome to your Earnings page. This page gives you a clear overview of your financial performance and payment requests. From here, you can track income, generate custom payment links, monitor payouts, and download transaction reports for record-keeping.

1. View Transaction History

Track and manage your recent client payments

1
Open the Earnings Page

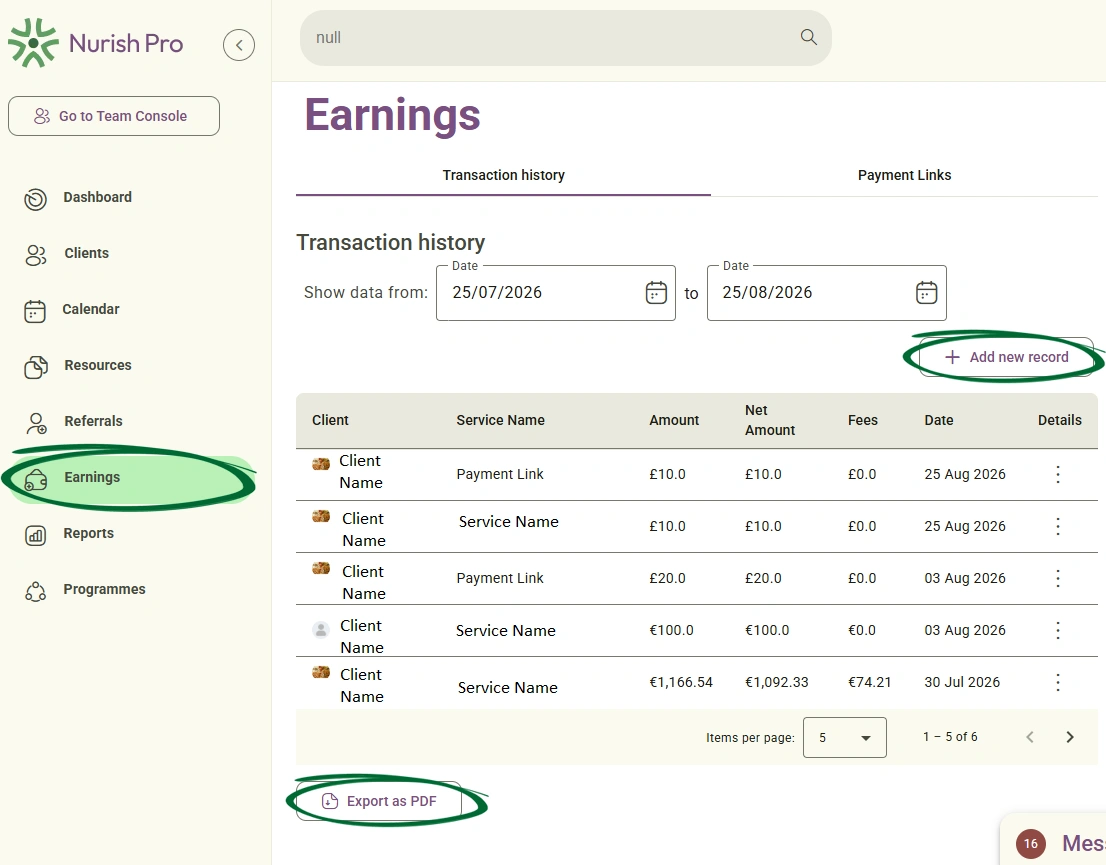
Click on the Earnings option in the left-hand navigation menu to open your main financial page.
add media screenshot
2
Review the Overview Table

Look at the Transaction history table to see your list of payments. The table displays key details including the client's name, the service provided, the amount charged, any Stripe processing fees, the net amount you receive, and the transaction date. 

3
See Detailed Information

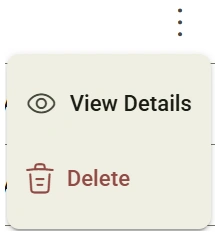
If you need to view more information about a specific entry, click the Three dots (:) option menu  under the 'Details' column on the right side of that row. Then, select "View Details".
add media screenshot

Each transaction record clearly displays the client's name alongside the specific service name they have booked. It breaks down the financial details by showing the gross amount, deducted Stripe processing fees, and your final net amount. Finally, you can easily track the exact transaction date and the precise day those funds will become available to you.

Tip: You can change how many rows are displayed on a single page by clicking the Items per page dropdown menu below the table.
2. Filter The Transaction History

Narrow down your data to a specific time period by a date range picker

1
Open the Earnings Page

Click on the Earnings option in the left-hand navigation menu to open your main financial page.

add media screenshot
2
Locate the Date Fields
Find the Show data from fields located right above the transaction history table.
3
Choose your Start Date

Enter the date into the first date box or click the small calendar icon to pick the start date for your search.

4
Choose your End Date
Enter the date into the second date box after the word to to select the final date for your desired range. The table will automatically update to show transactions from that period.
Note: Setting an accurate date range is highly recommended before downloading any files, as it ensures your reports only contain the data you currently need.
3. Add New Transaction Record

Manually record offline or custom payments directly into your financial overview.

1
Navigate to Transaction History

Click on Earnings in the left-hand navigation menu, then ensure the Transaction history tab is selected at the top of the page.

add media screenshot
2
Open the Add Record Modal

Click the + Add new record button located on the right side above the transaction table.

3
Enter Details

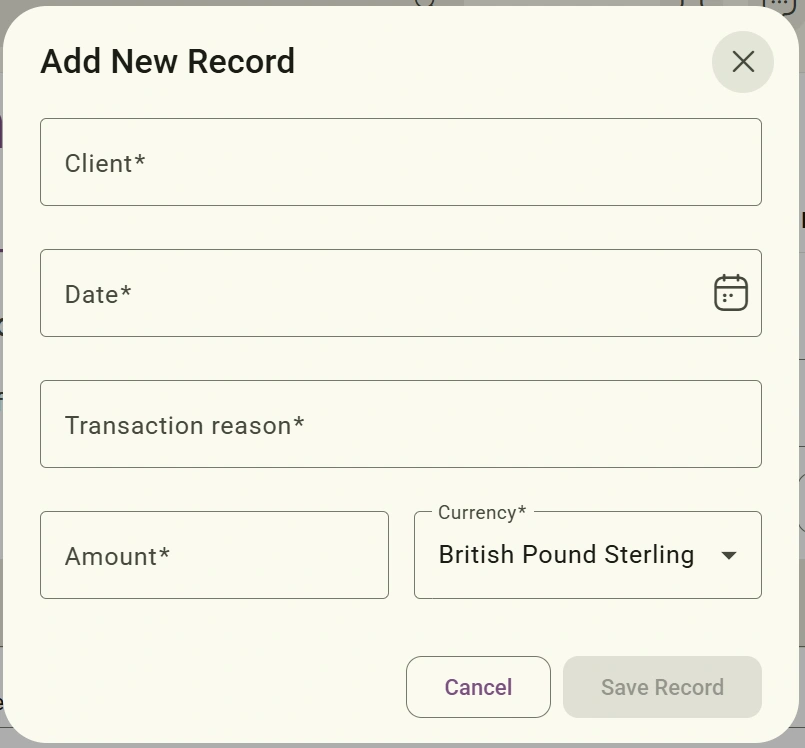
In the modal window that appears, fill in the required fields:

  • Client: Select or enter the client associated with the payment.
  • Date: Choose the transaction date by clicking the calendar icon.
  • Transaction reason: Provide a brief note or service name for the payment.
  • Amount: Enter the numerical transaction value.
  • Currency: Choose the applicable currency ( British Pound Sterling, Euro, or US Dollar) from the dropdown list.
add media screenshot
4
Save the Entry
Click the Save Record button to immediately add the transaction to your financial table. 
Tip: Manually added records will appear in your Transaction History table alongside automated platform payments, ensuring your exported PDF reports reflect your complete financial activity.
4. Export Transaction History

Download a clean PDF copy of your financial reports

1
Open the Earnings Page
Click on the Earnings option in the left-hand navigation menu to open your main financial page.
add media screenshot
2
Prepare your Filtered Data
Make sure you have selected the correct date range using the filters, as the system will export exactly what is currently filtered on your screen. 
3
Click the Export Button
Scroll to the bottom of the page and click the Export as PDF button located just beneath the transaction table.
4
Your Automatic Download
A professional PDF document containing your filtered earnings and transaction details will be instantly saved to your device, ready to be opened, stored, or printed. 
Tip: If your business uses multi-currency transactions (such as Euros and British Pounds), the exported PDF will cleanly display the respective currency symbol next to each amount for easier bookkeeping.
Frequently Asked Questions (FAQs)
What is the difference between "Amount" and "Net Amount"?
The Amount is the total gross payment made by your client for the booked service. The Net Amount is the actual money you receive after the Stripe processing fees have been deducted.
Where can I find the Stripe processing fees for a transaction?
You can view these fees by looking at the Fees column in the main table or by clicking the three dots (:) option menu under the 'Details' column then press “View Details” to open the full transaction breakdown.
Do I have to download all my transactions at once?
No, you do not. By using the date filters, you can choose a specific start and end date so that you only download the transaction data you actually need for that period.
What happens when I create a new payment link?
When you click Create Payment Link, the platform automatically generates a secure Stripe checkout link and emails it directly to your client so they can complete their payment online. 
Can I manually share a payment link with my client?
Yes. You can copy the payment link at any time by clicking the three-dots menu (⋮) next to the transaction and selecting Copy Link (or by opening View Details and clicking Copy Link). You can then paste and send it directly via email, message, or chat. 
Can I reactivate a payment link after disabling it?
No. Once a payment link is marked as DISABLED, it cannot be reactivated. If your client still needs to pay, you will need to create a new payment link for them.
Troubleshooting & Common Issues
Issue: My PDF download contains too many transactions / is too large.
Potential Solution: Filter by date before exporting! You do not need to download your entire history at once. Simply use the Show data from fields to choose a specific start and end date before clicking the export button. This ensures your downloaded PDF only contains the exact transaction data you need for that specific period.
Issue: I accidentally created a payment link with the wrong amount or currency
Potential Solution: Navigate to the Payment Links tab. Click the three-dots menu (⋮) next to the incorrect entry and select Disable. Click + Add New Payment Link to generate a new link with the correct amount and currency.
Issue: My client says they didn't receive the payment link email.
Potential Solution: If your client hasn't received their payment link email, first ensure the link displays a PENDING status under your Payment Links tab, then confirm that their email address is correctly configured in your clients tab in the main sidebar; if everything looks right, you can bypass the email entirely by clicking the three-dots menu (⋮) on that transaction row, selecting Copy Link, and sending the direct URL to your client via private message or email.

Next Step

Now that you've got the hang of how it all works, it’s time to put what you've learnt into action! Head straight over to your Nurish Pro platform to check out your actual client earnings, track your payouts, and watch those numbers roll in.  

Go to Earnings
Contact Support

Still need a hand?

Email Support: [email protected]